chocolate

Espresso Martini

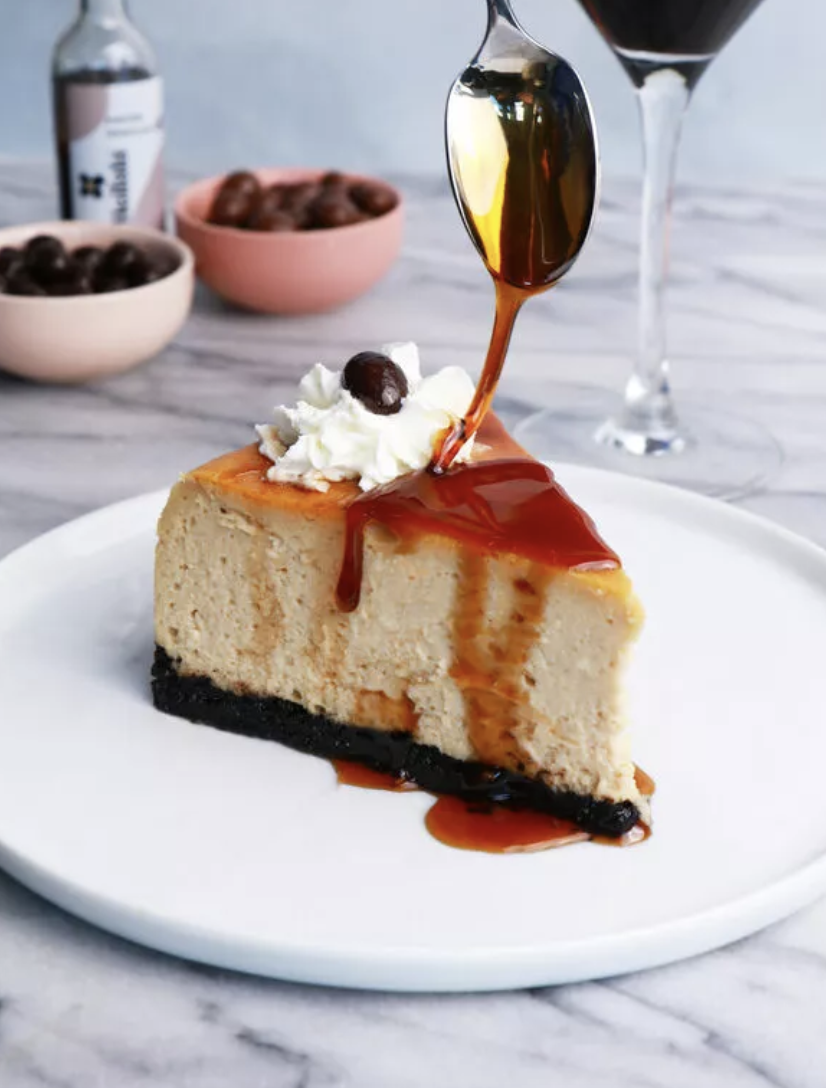
I've crafted the ultimate dessert by merging two of my favorites: cheesecake and espresso martinis! Introducing the Espresso Martini Cheesecake, a delightful fusion of tangy, sweet, and boozy flavors. With a chocolate cookie crust and a creamy filling made from espresso and coffee liqueur cream cheese, this cheesecake is sure to satisfy any craving. To elevate it even further, I've topped it with a coffee liqueur glaze and a dollop of whipped cream. Perfect for any occasion—brunch, dessert, or a cocktail party!

Photo by Katie Melody

INGREDIENTS 

  • 4 8 ounce packages cream cheese, room temperature

  • 1 1/3 cup sugar

  • 1/2 teaspoon salt

  • 2 teaspoons coffee extract

  • 1 cup sour cream, room temperature

  • 1/4 cup Kaluha

  • 1 shot of espresso or strong coffee

  • 2 tablespoons flour

    COFFEE SYRUP

  • 1/4 cup Kaluha

  • 1 teaspoon coffee extract

  • 1/4 cup sugar

  • 1 tablespoon water

  • Chocolate Covered Espresso Beans

RECIPE

  1. Line a 9-inch springform pan and wrap the bottom of the pan in a double layer of aluminum foil. Preheat the oven to 350°F.

  2. In a food processor, pulse the cookies until fine crumbs form, then add the espresso powder and melted butter, pulsing until combined.

  3. Pour the crumbs into the pan and use a spatula, the bottom of a shot glass, or a measuring cup to press an even layer of crumbs along the bottom of the pan.

  4. Place the pan on the center rack in the oven and bake for 15 minutes. Once baked, set the crust aside to cool on a rack while you make the cheesecake.

  5. In a stand mixer fitted with the paddle attachment, or with a hand mixer in a large bowl, beat the cream cheese until soft and creamy. Add the sugar and salt and beat until the cream cheese is light. Beat in the extract and eggs.

  6. Add the sour cream, Kahlúa, and coffee into the cheesecake mixture. Lastly, add the flour and beat until just combined.

  7. Give the batter a few stirs with a rubber spatula to ensure nothing has been left unmixed at the bottom of the bowl, and scrape the batter into the springform pan. Put the foil-wrapped springform pan in a roasting pan large enough to hold the pan and room for water in the oven. Pour enough boiling water into the roaster to come halfway up the sides of the springform pan.

  8. Bake the cheesecake for about 1½-2 hours, or until just set and slightly jiggly. Turn off the oven's heat and crack the door open or prop it open with a wooden spoon, allowing the cheesecake to cool slowly for 1 hour.

  9. After 1 hour, carefully pull the setup out of the oven, lift the springform pan out of the roaster — be careful, there may be some hot water in the aluminum foil — and remove the foil. Let the cheesecake come to room temperature on a cooling rack.

  10. When the cheesecake has cooled, discard the foil, and transfer the cheesecake to the refrigerator to cool for at least 4 hours, preferably overnight.

  11. For the coffee syrup, in a small saucepan, add the Kahlúa, extract, and sugar, and cook for 3-4 minutes until syrupy or until it coats the back of a spoon. Set aside to cool; it will thicken up. (If the sauce becomes too thick, heat it up in the microwave, or add a few teaspoons of water and stir.)

  12. At serving time, remove the sides of the springform pan and set the cheesecake on a serving platter. Pour the syrup on top and garnish with a few chocolate-covered espresso beans.

Chocolate Dipped Meringue Cookie

EDITED 7.JPG

Merry Christmas Eve!

Chocolate Dipped Meringue Cookie. I love anything meringue, pavlovas are my go-to desserts for a crowd. They are light/crispy on the outside and chewy in the inside! Meringue pairs well with any fruit or chocolate you top it with. Instead of making a pavlova or large meringue, these mini meringues are the perfect size for cookie swaps, a display and more importantly to pop into your mouth! Additionally, what makes these meringues extra unique, are the spices. Cinnamon, ginger, nutmeg, and cloves are folded in and after they are baked they are dipped into chocolate! What really adds a festive flare, is the crushed peppermint and pistachios that the meringue is finally dipped into after the chocolate.

I chose the peppermint and pistachios because they are festive for the holidays but if you prefer any other nut or to leave them plain, they are just as delicious!

Happy Holiday!

EDITED 1.JPG
EDITED 7.JPG
50AF1F48-5D8C-4734-98B4-6B757E70B3CD.JPG

Ingredients 

Meringue

  • 1 cup  granulated sugar

  • 1/4 cup water

  • 3  large egg whites

  • ½ tsp vanilla extract

  • 1/8 tsp  nutmeg

  • 1/8 tsp  cinnamon

  • 1/8 tsp  ginger

  • pinch  clove

For Dipping

  • ½ cup 60% bittersweet chocolate chips

  • 1/4 cup crushed candy canes

  • 1/4 cup  roasted pistachios, finely chopped

Recipe

  1. Preheat oven to 175º F. 

  2. Line a large baking sheet with parchment paper. Place egg whites in a stand-mixer bowl with a whip attachment.

  3. In a small pot, add sugar and pour water over sugar. Cook over medium-high heat until sugar mixture begins to simmer. Meanwhile, begin whipping the egg whites until stiff peaks form. 

  4. While the egg whites whip, continue to cook sugar until it reaches 240º F. If any sugar sprays onto the sides of the pot, use a pastry brush dipped in cold water to wipe down the sides, this will prevent the sugar from crystallizing.  

  5. Once the sugar syrup reaches the proper temperature, with the mixer on medium-low speed, slowly add the hot sugar syrup to egg whites. Pour the sugar syrup down the side of the mixer bowl, avoiding the whisk, and allow it to stream into the egg whites gradually. This prevents overheating the egg whites. 

  6. Once all the sugar syrup has been added,  increase the speed to high and whip whites until the bottom of the mixer bowl should be cool to the touch, about 5 minutes. 

  7. In a small bowl, whisk the spices together. Fold the spices into the meringue. Transfer meringue into a piping bag fitted with Wilton 4B piping tip.

  8. On prepared baking sheet, pipe 1-inch wide meringues in a  row, spacing ¼-inch apart. 

  9. Bake for 2 hours, with oven door just slightly ajar, until dry to the touch. Place a heat-proof spoon in the door if needed, as this will help the  steam to escape while baking and prevent the meringues from cracking. Once they are done baked, remove meringues from oven and let cool.  

  10. Meanwhile, place the crushed candy canes and nuts into two separate bowls. Place the chocolate into a bowl. Heat each bowl just until chips are mostly melted, then stir to incorporate the small unmelted bits. This will help to keep the chocolate in temper and provide a firm setting of the chocolate. Dip the peppermint meringues into the dark chocolate and then directly into the crushed candy canes. Dip the eggnog meringues into the white chocolate and directly into the hazelnuts. Dip the gingerbread meringues into the milk chocolate and directly into the pistachios. Place all finished meringues onto a parchment or silicone mat lined baking sheet to set. 

Store meringues in an airtight container at room temperature, for up to three days or seal in gift bags and share with others to enjoy.  

Chocolate Crinkle Cookies

EDITED 4.JPG

Merry Christmas Eve! Today we are making Chocolate Crinkle Cookies!

These chewy and crispy cookies are irresistible and should definitely be a part of your Christmas dessert table this year!

I have made different versions of these cookies, from only using cocoa powder or to just using melted chocolate, but I found that both of those methods make the cookies cakey.

I found this recipe from America's Test Kitchens which uses both melted chocolate and cocoa powder.

In addition to those ingredients, unlike most crinkle cookies, these use both baking powder and baking soda which gave the cookies a lift and a good spread, creating a thinner and crispier cookie.

One of my favorite things that I learned from making this cookie was how they use both powdered sugar and granulated sugar for the coating of the cookie. Most crinkle cookies use only powdered sugar, but from my own experience, and from this recipe, I learned that just using powdered sugar does not allow the sugar to adhere to the cookie. When both sugars are used, the granulated sugar creates a crystallized crust allowing the powdered sugar to adhere better and creates a crispier, more attractive crack.

This is my absolute new favorite cookie recipe, and I hope after trying it, it becomes yours too!

 
EDITED 3.JPG
xmas edit 5.JPG
CHOCcrinkleCOOKIE
JPEG image-B1B7FBEAFA36-1.jpeg
 

Ingredients 

  • 1 cup all-purpose flour

  • ½  cup Dutch-process cocoa powder

  • 1 tsp. baking powder

  • ½ tsp. baking soda

  • ½  tsp. kosher salt

  • 1 ½  cup brown sugar

  • 3 large egg

  • 1 tsp. vanilla extract

  • 4 oz. unsweetened chocolate, chopped

  • 4 tbsp, unsalted butter

  • ½ cup granulated sugar

  • ½ cup confectioner’ sugar

Recipe

  1. Preheat oven to 325 degrees F. Line 2 baking sheets with parchment paper.

  2. Whisk together the flour, cocoa powder, baking powder, baking soda, and salt in a medium bowl.

  3. Combine the unsweetened chocolate and butter in a small bowl and microwave for 30 seconds, stir pieces and return to microwave for another 30-second interval until chocolate is melted, allow to cool.

  4. In an electric mixer, beat the brown sugar, eggs and vanilla. Add the cooled chocolate to the beaten eggs and sugar mixture, beat until combined.

  5. Add the dry ingredients, beat until just combined. Let the dough sit for 10 minutes at room temperature.

  6. Place the granulated sugar and powdered sugar in separate shallow bowls. Working with a cookie scoop, roll the dough into balls. Drop dough balls directly into granulated sugar and roll to coat. Transfer dough balls to powdered sugar and roll to coat evenly. Evenly space the dough balls on the prepared baking sheets.

  7. Bake the cookies until puffed and cracked have just begun to set but center is still soft, about 12 minutes. Let the cookies cool completely.

    Recipe by America’s Test Kitchens


Halloween Chocolate Cake

My blog is officially one year old, and I can't believe how fast it's gone by.

I'm so thankful to all of you, my supportive followers! It has been a year of failures and victories, but I have learned so much along the way.

One of my biggest challenges this year was blogging. I love trying out new recipes, and I find myself baking up a storm before even publishing my last recipe, but always end up not writing as much as I would like to! So, one of my goals for this year is to blog more, share a little more about myself, and bring you a little deeper into my kitchen.

Halloween Cake

Another goal is definitely to cook more. I began this blog intending to recreate classic Portuguese dishes, but end up trying out many other recipes other than Portuguese. I went through a period where I felt like I had let myself down for not sticking to my original inspiration for my blog. Still, I'm happy the way it turned out because I ended up trying out recipes otherwise would never have if I stuck with my initial plan.

I have also been practicing baking and decorating cakes lately. Instagram is filled with cake, making videos that I find myself watching on repeat. They make it look so simple, but in reality, it takes a lot of practice to get at that level, so that's why this year perfecting and delivering easy but creative cakes, like this Halloween one, is another one of my goals.

Halloween Chocolate Cake

This Halloween, I chose to bake my favorite chocolate cake, which is frosted with a delicious cream cheese frosting and marshmallows to look like cobwebs. The cake is filled with a raspberry persevere filling, that can easily be substituted for your preferred berry jam I love this combo of flavors, the preserve gives it the right amount of acid to balance out the sweetness of the cake and frosting. Also, the preserves provide a good "bloody" effect that goes well with the Halloween theme!

 
Halloween Chocolate Cake

Ingredients 

Chocolate Cake

  • ½ cup + 2 tablespoons canola oil

  • 1 cup granulated sugar

  • 1 cup brown sugar

  • 3 large eggs

  • 2 teaspoons vanilla extract

  • 2 cups all-purpose flour

  • ¾ cup unsweetened cocoa powder

  • 1 teaspoon baking powder

  • 2 teaspoons baking soda

  • 1 teaspoon salt

  • 1 cup buttermilk

  • 1 cup hot coffee

Cream Cheese Frosting

  • 16 oz. of cream cheese, room temperature 

  • 2 sticks of unsalted butter, room temperature

  • 4 ½ cups of confectioners’ sugar

  • 2 teaspoons of vanilla extract

  • 1 pinch of salt

  • 1 tablespoon of heavy cream

  • 1 tablespoon of cocoa powder

  • black and orange food coloring/gel

  • 1 bag  marshmallows

Raspberry Filling 

  • 1 cup of raspberry preserves

  • ¼ cup of fresh or frozen raspberries

Recipe

Chocolate Cake

  1. Preheat oven to 350º. Grease two 8-inch cake pans and dust with cocoa powder, set aside.

  2. Sift together flour, cocoa powder, baking powder, baking soda, and salt and set aside.

  3. In the bowl of a stand mixer fitted with paddle attachment, beat together the oil and both sugars on medium speed for 2 minutes.Scrape down the sides of the bowl. Add the eggs and vanilla. Beat again. 

  4. With  the mixer on low, carefully add flour mixture in three batches, alternating with the buttermilk, beginning and ending with the flour mixture. Stop the mixer, and scrape down the sides and the bottom of the bowl, making sure there aren’t any unmixed pieces. 

  5. With the mixer on low, stream in the hot water. Mix on medium-low until combined.

  6. Evenly divide the batter among the prepared pans. Bake for 23 to 25 minutes, or until a toothpick inserted into the center of the cakes comes out clean. Let them cool on a wire rack before removing the cakes from their pans.

  7. Once they are cool enough to handle, carefully remove them from the pans and set them on a wire rack while you make the frosting.

Raspberry Filling

  1. Add the raspberry preserves in a small saucepan with the frozen or fresh fruit. Bring it to a boil, or until the fruit has softened, mash the fruit and stir the mixture. Pour it into a separate bowl and allow it to cool completely. 

*  Substitute raspberry for your preferred berry 

Frosting

  1. In a large bowl using a handheld or stand mixer fitted with a whisk or paddle attachment, beat the cream cheese and butter together on medium-high speed until smooth, about 2 minutes. 

  2. Add the confectioners’ sugar, cream, vanilla extract, and a pinch of salt. 

  3. Beat on low speed for 30 seconds, then increase to high speed and beat for 3 minutes until completely combined and creamy. 

*Add more confectioners’ sugar if frosting is too thin, more milk if frosting is too thick, or an extra pinch of salt if frosting is too sweet. 

Assemble

  1. Take 1 cup of frosting and divided into two small bowls, add about 2-3 drops of orange food coloring to one bowl. In another bowl, add a tablespoon of cocoa powder, and 5-7 drops the black food coloring or gel and mix it.

  2. Place one cake layer on your cake stand or serving plate. Evenly pipe the edge of the cake with non-colored cream cheese frosting, add the raspberry preserves to the center. Top with 2nd layer and repeat the step. Top with the third layer, spread remaining non-colored cream cheese frosting on top and around the cake using a bench scraper or offset spatula.

  3.  Refrigerate for 15 minutes. Take your cake out of the refrigerator and apply the colored frosting around the cake using a small offset spatula. 

  4. Melt the marshmallows in the microwave in 30-second intervals, stirring after every interval until the marshmallows are melted and smooth. Allow to cool and then use your hands to stretch/pull the melted marshmallow around the cake to create a spider web. 

Chocolate Birthday Cake

Today is a very special day in our household!

It’s my dog, Oliver’s 4th birthday. Oliver came into my life at a low point, and he has brought so much joy, love, and laughter into our lives. We really couldn’t imagine life without him. 

 In honor of his birthday, I am sharing my absolute favorite birthday cake recipe. If you have followed me along, you know how much I love cheesecake.

 Cheesecake has always been my choice of cake for my birthday, but last year I decided that it was time to change it up! So I celebrated my 22nd birthday with this amazing chocolate cake!

 This chocolate cake is the only recipe you’ll ever need. If you aren’t a big cream cheese frosting fan, no worries, use your favorite frosting and follow along with the rest of the recipe to assemble it.

 This rich chocolate cake is an oil-based cake which makes it extra moist and the cream cheese frosting helps balance out the sweetness of the cake thanks to the tanginess from the cream cheese. 

Anytime I bake, Oliver always joins me in the kitchen to scope out the situation, and of course to get a little treat. Cream cheese frosting is something he loves and knows that if he looks at me with those beautiful brown puppy eyes, he will get to lick the bowl!

 So Happy Birthday to the best dog in the world, Oliver! 

Come along and celebrate with a slice of this delicious chocolate cake.


Chocolate Birthday Cake
Chocolate Birthday Cake -MPM
E8680F51-D6A1-484E-BA93-BC66DEA59C46.JPG
Chocolate Birthday Cake
CF1C0F14-6292-4761-A0DD-9C37E2337277.JPG
E82F1989-9977-4F7B-A884-C2C25C46AD98.JPG

Ingredients 

Chocolate Cake

  • ½ cup + 2 tablespoons canola oil

  • 1 cup granulated sugar

  • 1 cup brown sugar

  • 3 large eggs

  • 2 teaspoons vanilla extract

  • 2 cups all-purpose flour

  • ¾ cup unsweetened cocoa powder

  • 1 teaspoon baking powder

  • 2 teaspoons baking soda

  • 1 teaspoon salt

  • 1 cup buttermilk

  • 1 cup hot water

Cream Cheese Frosting

  • Two 8oz. Packages of cream cheese, room temperature 

  • 2 sticks of unsalted butter, room temperature

  • 4 ½ cups of confectioners sugar

  • 2 teaspoons of vanilla extract

  • 1 pinch of salt

  • 1 tablespoon of heavy cream

  • Assorted gel/food coloring

  • Assorted candies

Recipe

Chocolate Cake

  1. Preheat oven to 350º. Grease two 8-inch cake pans and dust with cocoa powder, set aside.

  2. Sift together flour, cocoa powder, baking powder, baking soda, and salt and set aside.

  3. In the bowl of a stand mixer fitted with paddle attachment, beat together the oil and both sugars on medium speed for 2 minutes.Scrape down the sides of the bowl. Add the eggs and vanilla. Beat again. 

  4. With  the mixer on low, carefully add flour mixture in three batches, alternating with the buttermilk, beginning and ending with the flour mixture. Stop the mixer, and scrape down the sides and the bottom of the bowl, making sure there aren’t any unmixed pieces. 

  5. With the mixer on low, stream in the hot water. Mix on medium-low until combined.

  6. Evenly divide the batter among the prepared pans. Bake for 23 to 25 minutes, or until a toothpick inserted into the center of the cakes comes out clean. Let them cool on a wire rack before removing the cakes from their pans.

  7. Once they are cool enough to handle, carefully remove them from the pans and set them on a wire rack while you make the frosting.

Frosting

  1. In a large bowl using a handheld or stand mixer fitted with a whisk or paddle attachment, beat the cream cheese and butter together on medium-high speed until smooth, about 2 minutes. 

  2. Add the confectioners’ sugar, cream, vanilla extract, and a pinch of salt. 

  3. Beat on low speed for 30 seconds, then increase to high speed and beat for 3 minutes until completely combined and creamy. 

*Add more confectioners’ sugar if frosting is too thin, more milk if frosting is too thick, or an extra pinch of salt if frosting is too sweet. 


Assemble

  1. Take 1 cup of frosting and divided into two small bowls, add your choice of coloring and mix it.

  2. Place 1 cake layer on your cake stand or serving plate. Evenly cover the top with non-colored cream cheese frosting. Top with 2nd layer and spread remaining non-colored cream cheese frosting on top and around the cake using a bench scraper or spatula.

  3.  Refrigerate for 15 minutes. Take your cake out of the refrigerator, and apply the colored frosting around the cake using again your icing spatula and bench scraper. Top with your assorted candies, if using.