Valentines Day

Espresso Martini

I've crafted the ultimate dessert by merging two of my favorites: cheesecake and espresso martinis! Introducing the Espresso Martini Cheesecake, a delightful fusion of tangy, sweet, and boozy flavors. With a chocolate cookie crust and a creamy filling made from espresso and coffee liqueur cream cheese, this cheesecake is sure to satisfy any craving. To elevate it even further, I've topped it with a coffee liqueur glaze and a dollop of whipped cream. Perfect for any occasion—brunch, dessert, or a cocktail party!

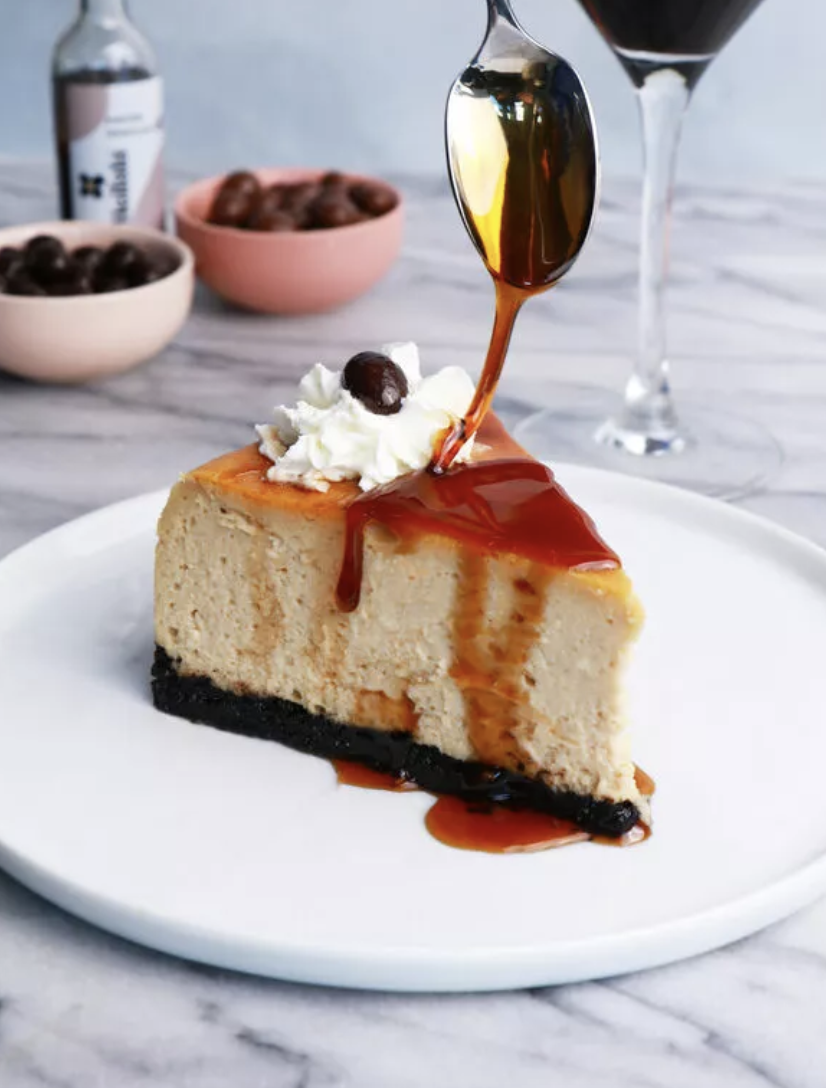
Photo by Katie Melody

INGREDIENTS 

  • 4 8 ounce packages cream cheese, room temperature

  • 1 1/3 cup sugar

  • 1/2 teaspoon salt

  • 2 teaspoons coffee extract

  • 1 cup sour cream, room temperature

  • 1/4 cup Kaluha

  • 1 shot of espresso or strong coffee

  • 2 tablespoons flour

    COFFEE SYRUP

  • 1/4 cup Kaluha

  • 1 teaspoon coffee extract

  • 1/4 cup sugar

  • 1 tablespoon water

  • Chocolate Covered Espresso Beans

RECIPE

  1. Line a 9-inch springform pan and wrap the bottom of the pan in a double layer of aluminum foil. Preheat the oven to 350°F.

  2. In a food processor, pulse the cookies until fine crumbs form, then add the espresso powder and melted butter, pulsing until combined.

  3. Pour the crumbs into the pan and use a spatula, the bottom of a shot glass, or a measuring cup to press an even layer of crumbs along the bottom of the pan.

  4. Place the pan on the center rack in the oven and bake for 15 minutes. Once baked, set the crust aside to cool on a rack while you make the cheesecake.

  5. In a stand mixer fitted with the paddle attachment, or with a hand mixer in a large bowl, beat the cream cheese until soft and creamy. Add the sugar and salt and beat until the cream cheese is light. Beat in the extract and eggs.

  6. Add the sour cream, Kahlúa, and coffee into the cheesecake mixture. Lastly, add the flour and beat until just combined.

  7. Give the batter a few stirs with a rubber spatula to ensure nothing has been left unmixed at the bottom of the bowl, and scrape the batter into the springform pan. Put the foil-wrapped springform pan in a roasting pan large enough to hold the pan and room for water in the oven. Pour enough boiling water into the roaster to come halfway up the sides of the springform pan.

  8. Bake the cheesecake for about 1½-2 hours, or until just set and slightly jiggly. Turn off the oven's heat and crack the door open or prop it open with a wooden spoon, allowing the cheesecake to cool slowly for 1 hour.

  9. After 1 hour, carefully pull the setup out of the oven, lift the springform pan out of the roaster — be careful, there may be some hot water in the aluminum foil — and remove the foil. Let the cheesecake come to room temperature on a cooling rack.

  10. When the cheesecake has cooled, discard the foil, and transfer the cheesecake to the refrigerator to cool for at least 4 hours, preferably overnight.

  11. For the coffee syrup, in a small saucepan, add the Kahlúa, extract, and sugar, and cook for 3-4 minutes until syrupy or until it coats the back of a spoon. Set aside to cool; it will thicken up. (If the sauce becomes too thick, heat it up in the microwave, or add a few teaspoons of water and stir.)

  12. At serving time, remove the sides of the springform pan and set the cheesecake on a serving platter. Pour the syrup on top and garnish with a few chocolate-covered espresso beans.

Salted Caramel Popcorn Olive Oil Brownies

Chocolate and extra virgin olive oil, two ingredients that are good for your heart... So what better to pair them up and create a brownie. It definitely makes me feel better when I reach for a second or third piece!

This is a New York Times recipe and is my go-to brownie. The olive oil helps balance out all the sugar and chocolate and enhances the chocolate flavor. I love this recipe because it is indulgent but not overly sweet and is chewy and fudgy on the inside but crispy on the outside.

It's important to use a mild olive oil in the recipe, any oil that is too robust and sharp in flavor will overpower the chocolate flavor.

How can we make this brownie even more delicious? Top it off with a handful of caramel corn! Other than your dentist... who does not love a crunchy salty and sweet caramel corn? Salted butter and sea salt at the end helps to balance the sweetness from the corn syrup and brown sugar.

Add a scoop of dulce de leche ice cream to make this dessert an even more perfectly balanced treat!

56A3E3AA-63CE-4132-BED4-4247E17DB807-1EA53CEB-C816-4179-A22B-AFE11B7B028C.JPG
Salted Caramel Popcorn Olive Oil Brownies

Ingredients 

Caramel Popcorn 

  •  8-10 cups freshly popped popcorn, (about ¼ of kernels or 1 microwavable bag)

  • 1 cup packed light brown sugar

  • 1/4 cup light corn syrup

  • 1/2 cup salted butter

  • ¼ teaspoon vanilla extract

  • 1/2 teaspoon salt

  • 1/2 teaspoon baking soda

  • Flaky Sea Salt

Olive Oil Brownies 

  • 6 tablespoons  mild extra-virgin olive oil, plus more for greasing pan

  • 3 ounces melted unsweetened chocolate

  • 1 large egg, at room temperature

  • 1 tablespoon vanilla extract

  • ¾ cup  packed dark brown sugar

  • ⅓ cup  granulated sugar

  • 1 cup  all-purpose flour

  • ¾ teaspoon kosher salt

  • ¼ teaspoon baking powder

  • ¼ cup Dutch-processed cocoa powder

  • ¼ cup boiling water

  • ½ cup chocolate chips

  •  Flaky sea salt

Recipe

Popcorn

  1. Preheat the oven to 250°F. Lightly spray 2 sheet pans with baking spray. Grease the bottom of a spatula with the baking spray. Spread the popcorn out onto baking sheets. Set aside.

  2. Combine the sugar, corn syrup, butter, cream of tartar in a medium saucepan over a medium-high heat. Stir constantly and bring to a boil for about 5 minutes. Remove from the heat and quickly stir in the baking soda, vanilla extract and salt. 

  3. Immediately pour the caramel mixture over the popcorn. Working quickly and carefully, use spatulas to toss the caramel and popcorn together, until the popcorn is well coated.

  4. Bake for 1 hour, stirring every 15 minutes. Allow to cool on the pan and break apart large clusters. Can be stored in an airtight container for up to a week.

Brownies 

  1. Heat oven to 350° F.  Grease an 8-by-8-inch square baking dish with some of the olive oil and line pan with parchment paper, leaving a 2-inch overhang on both sides, to lift the brownies out of the pan

  2. In a medium bowl, whisk together flour, salt and baking powder.In a large bowl, whisk together cocoa powder and boiling water until smooth. 

  3. Whisk in 6 tablespoons olive oil, melted chocolate, egg and vanilla.Whisk in the brown and granulated sugar, then fold in flour mixture. Then fold in chocolate chips. 

  4. Scrape into the prepared pan, and bake until set and firm to the touch, 20 to 25 minutes.

  5. Once baked, allow it to cool

  6. Cut into squares, serve with a scoop of your favorite ice cream and a handful of the caramel popcorn.                                                    


Brownie recipe from NYT

Butternut Squash Ravioli

It's officially Fall! My favorite cooking and baking season!

I love the warm spices, and hearty vegetables autumn gives us. One of my favorite ingredients to cook with is squash, whether it's pumpkin, butternut, or acorn; the abundance of varieties gives me so much to work with. I wanted to open this season with my absolute favorite pasta, Butternut Squash Ravioli.

I chose to cook with butternut squash rather than pumpkin, because I enjoy the neutral flavor butternut squash has, as opposed to the somehow strong flavor of the pumpkin. It allows me to control the flavor a bit more.

I used the food processor to make the pasta, which I'm sure every Italian is fainting over at this very moment, but this process worked brilliantly! Not only was it quicker, but less messy!

If a food processor is not up to your alley or if you don't have one, my Fresh Pasta Dough recipe works perfectly for ravioli as well.

The filling is made with butternut squash, brown sugar, nutmeg, salt, and pepper - working beautifully together. The brown sugar brings out the natural sweetness of the squash, while the salt and pepper help balance those flavors, and a hint of nutmeg warms it all up!

Making the ravioli may be intimidating, but I promise you it's a lot easier than you think and tons of fun! A traditional ravioli is usually square, but today we are throwing the rule books out the window and making round ravioli.

I used a teaspoon to help to measure the filling, but you can use even a piping bag to ensure an even dollop.

Time to shape the ravioli! During this step, you can be creative, if you don't have a ravioli cutter, you may use a cup and crimp the edges with a fork, or a cookie-cutter works just as well.

Making pasta from scratch if often very intimidating, making people too afraid to try it, but I hope this recipe allows you to face your fears!

Remember, cooking is supposed to be fun, and even though you may not get it perfect the first time around, practice makes it perfect!

photo2.jpg
photo3.jpg
photo4.jpg
photo9.jpg
photo1.jpg
photo7.jpg
photo5.jpg
photo6.jpg
photo13.jpg
photo15.jpg
photo11.jpg

Ingredients

Food Processor Pasta Dough

  • 2 cups all-purpose flour

  • 1/2 teaspoon salt

  • 3 large eggs

Butternut Squash Filling

  • 1 lb butternut squash

  • 1 egg yolk

  • 1 tablespoon brown sugar

  • ½ teaspoon ground nutmeg

  • salt and pepper

Rosemary Brown Butter Sauce

  • 2 -3 sprigs of rosemary

  • 1 stick of salted butter

  • 2 cloves garlic, minced or grated

  • Salt and pepper

  • 1/4 cup white wine 

Recipe

Ravioli Filling 

  1. Preheat your oven to 400° F and line a baking sheet with parchment paper. 

  2. Place butternut squash on a pan, cut sides up. Prick the squash, drizzle with olive oil and generously season with salt and pepper. Roast for 35 to 45 minutes, or until soft. Allow to cool.

  3. Scoop out the flesh of the squash into the bowl of a food processor. Add egg, brown sugar, nutmeg, and salt & pepper, purée until smooth. Place the filling in a bowl, cover, and set aside.

Pasta

  1. In a clean food processor, add flour and salt, pulse a few times to combine. In a separate bowl, lightly beat eggs. Drizzle the eggs in a food processor, pulse until mixture comes together. * If the dough is too dry, drizzle in some water and pulse again, OR, if the mix is too wet, add some flour.

  2. Turn the pasta dough onto a lightly floured work surface and knead the dough into a smooth ball. Cover the dough with plastic wrap and rest for 30 minutes.

  3.  Secure a pasta machine to the edge of a long countertop. Using a bench scraper, cut the dough into four pieces. Keep the extra dough covered in plastic wrap while working with one piece. With a rolling pin, roll a piece of dough into a rough rectangle so that it will fit inside the widest setting of the pasta machine. Roll the dough through the machine, catching it with one hand as you roll with the other. Take the dough and tri-fold it like a letter. Turn the dough, so one open end faces the machine and roll it through on the widest setting again. Fold, turn, and roll once more on the widest setting. 

  4. Continue rolling the pasta through the machine without folding, adjusting the rollers to a smaller setting each time, until the desired thickness is reached. 

  5. Place a 12-by-4 ½ - 5-inch sheet of pasta on a lightly floured surface with the longest edge facing you. Fold the dough in half lengthwise, press gently to make a crease, and then unfold the dough. 

  6. Place about two teaspoons of the butternut squash filling 2 inches along the furthest edge of the pasta, about 1 1/2 inches in from the edge. Dip a finger in a small bowl of water and drag your finger around each mound of filling to moisten the pasta. 

  7. Fold the front edge of the dough over the mounds. Starting in the center, gently press and shape the dough around each mound, working out to the sides. To ensure that the pasta cooks evenly, make sure the air is pressed out, and the filling is secured neatly in a circular mound in the pasta.

  8. Use a 2-inch round pastry cutter to cut the ravioli into circles, Or, crimp edges with the tines of a fork. Transfer the ravioli to a lightly floured sheet pan with semolina flour. Repeat with the remaining dough to make about 40 raviolis.

  9. Meanwhile, in a medium saucepan, brown the butter, stirring often until the butter is golden and toasted. Add the rosemary and garlic and cook 30 seconds to a minute or until fragrant. Pour in the wine, season with salt and pepper and bring to a simmer.

  10. Bring a large pot of salted water to boil. Boil the ravioli in batches for 2-3 minutes or until they float. Drain. Be gentle when working with the ravioli as they are delicate.

  11. Add the drained ravioli to the brown butter and toss to coat.

  12. Serve immediately.

* Freeze leftover raviolis by placing them in a single layer on a baking sheet. Once they are frozen, transfer them to an airtight freezer-safe bag or container. Cook them straight from the freezer. 

Chocolate Birthday Cake

Today is a very special day in our household!

It’s my dog, Oliver’s 4th birthday. Oliver came into my life at a low point, and he has brought so much joy, love, and laughter into our lives. We really couldn’t imagine life without him. 

 In honor of his birthday, I am sharing my absolute favorite birthday cake recipe. If you have followed me along, you know how much I love cheesecake.

 Cheesecake has always been my choice of cake for my birthday, but last year I decided that it was time to change it up! So I celebrated my 22nd birthday with this amazing chocolate cake!

 This chocolate cake is the only recipe you’ll ever need. If you aren’t a big cream cheese frosting fan, no worries, use your favorite frosting and follow along with the rest of the recipe to assemble it.

 This rich chocolate cake is an oil-based cake which makes it extra moist and the cream cheese frosting helps balance out the sweetness of the cake thanks to the tanginess from the cream cheese. 

Anytime I bake, Oliver always joins me in the kitchen to scope out the situation, and of course to get a little treat. Cream cheese frosting is something he loves and knows that if he looks at me with those beautiful brown puppy eyes, he will get to lick the bowl!

 So Happy Birthday to the best dog in the world, Oliver! 

Come along and celebrate with a slice of this delicious chocolate cake.


Chocolate Birthday Cake
Chocolate Birthday Cake -MPM
E8680F51-D6A1-484E-BA93-BC66DEA59C46.JPG
Chocolate Birthday Cake
CF1C0F14-6292-4761-A0DD-9C37E2337277.JPG
E82F1989-9977-4F7B-A884-C2C25C46AD98.JPG

Ingredients 

Chocolate Cake

  • ½ cup + 2 tablespoons canola oil

  • 1 cup granulated sugar

  • 1 cup brown sugar

  • 3 large eggs

  • 2 teaspoons vanilla extract

  • 2 cups all-purpose flour

  • ¾ cup unsweetened cocoa powder

  • 1 teaspoon baking powder

  • 2 teaspoons baking soda

  • 1 teaspoon salt

  • 1 cup buttermilk

  • 1 cup hot water

Cream Cheese Frosting

  • Two 8oz. Packages of cream cheese, room temperature 

  • 2 sticks of unsalted butter, room temperature

  • 4 ½ cups of confectioners sugar

  • 2 teaspoons of vanilla extract

  • 1 pinch of salt

  • 1 tablespoon of heavy cream

  • Assorted gel/food coloring

  • Assorted candies

Recipe

Chocolate Cake

  1. Preheat oven to 350º. Grease two 8-inch cake pans and dust with cocoa powder, set aside.

  2. Sift together flour, cocoa powder, baking powder, baking soda, and salt and set aside.

  3. In the bowl of a stand mixer fitted with paddle attachment, beat together the oil and both sugars on medium speed for 2 minutes.Scrape down the sides of the bowl. Add the eggs and vanilla. Beat again. 

  4. With  the mixer on low, carefully add flour mixture in three batches, alternating with the buttermilk, beginning and ending with the flour mixture. Stop the mixer, and scrape down the sides and the bottom of the bowl, making sure there aren’t any unmixed pieces. 

  5. With the mixer on low, stream in the hot water. Mix on medium-low until combined.

  6. Evenly divide the batter among the prepared pans. Bake for 23 to 25 minutes, or until a toothpick inserted into the center of the cakes comes out clean. Let them cool on a wire rack before removing the cakes from their pans.

  7. Once they are cool enough to handle, carefully remove them from the pans and set them on a wire rack while you make the frosting.

Frosting

  1. In a large bowl using a handheld or stand mixer fitted with a whisk or paddle attachment, beat the cream cheese and butter together on medium-high speed until smooth, about 2 minutes. 

  2. Add the confectioners’ sugar, cream, vanilla extract, and a pinch of salt. 

  3. Beat on low speed for 30 seconds, then increase to high speed and beat for 3 minutes until completely combined and creamy. 

*Add more confectioners’ sugar if frosting is too thin, more milk if frosting is too thick, or an extra pinch of salt if frosting is too sweet. 


Assemble

  1. Take 1 cup of frosting and divided into two small bowls, add your choice of coloring and mix it.

  2. Place 1 cake layer on your cake stand or serving plate. Evenly cover the top with non-colored cream cheese frosting. Top with 2nd layer and spread remaining non-colored cream cheese frosting on top and around the cake using a bench scraper or spatula.

  3.  Refrigerate for 15 minutes. Take your cake out of the refrigerator, and apply the colored frosting around the cake using again your icing spatula and bench scraper. Top with your assorted candies, if using. 


Raspberry Macarons

Pucker up, its Valentines day and these Raspberry Macarons are both tart and sweet!

Macarons are a classic French pastry, they are made from almond flour, confectioner sugar, and egg whites.

They are such a treat but usually difficult to make.

However, this recipe is foolproof!

I've made this recipe several times, and each one comes out perfect!

One of the things that I love most about Macarons is how versatile they are.

Because today is Valentines Day, I made a Pink macaron with a delicious cream cheese raspberry filing!

My Portuguese Mother // Raspberry Macarons


Ingredients 

 Macarons

  • 3/4 cup almond flour

  • 1 cup confectioners’ sugar

  • 2 large egg whites, at room temperature

  • 1/4 cup granulated sugar

  • Red food coloring

 Raspberry Filling

  • 1 stick butter, softened

  • 8 oz cream cheese, softened

  • 3 1/2 to 4 cups powdered sugar

  • ½ fresh raspberries

Recipe

  Macarons

  1. Line 2 baking sheets with parchment paper. Preheat oven to 325 F.

  2. Combine almond flour and confectioners’ sugar in a bowl and whisk together. Pass mixture through a fine-mesh sieve, pressing down on clumps.

  3. In a large bowl, beat the egg whites using a hand-mixer or stand-mixer on medium speed for 2 minutes until soft peaks form. Add the granulated sugar and beat on high for 2 more minutes until stiff, glossy peaks form.

  4. Add red food coloring and beat on high for another 30 seconds.

  5. Gently fold in dry ingredients and repeat until the batter falls into ribbons when spatula is lifted.

  6. Transfer the batter to a pastry bag with a 1/2 inch round tip.

  7. Pipe batter into 3/4-inch round circles, 1 inch apart.

  8. Tap the baking sheet firmly against the counter to release any air bubbles. Let stand at room temperature for 30 minutes until they form a skin.

  9. Bake for 10-12 minutes, rotating halfway, until cookies have risen and just set. Let cool for 5 minutes then transfer to wire rack and let cool completely.

Raspberry Filling

  1. Puree the 1/2 cup raspberries in a food process, or blender. If you don't want seeds in your frosting, press the puree through a strainer. ( I left the seeds in)

  2. In an electric mixer, beat butter, cream cheese until all combined. Turning mixer on low, add in the powdered sugar and beat until smooth.

  3. Add in the pureed raspberries and beat until all combined and smooth.

  4. Transfer the filling into a piping bag with a stared tip.

  5. Pipe a swirl on one half the macarons and sandwich them together.