Pasta

Chef Jose Andres : Mushroom Orzo Risotto

April/May 2020 Cookbook of the Month, Chef Jose Andres' Vegetables Unleashed

Rather than using the traditional Arborio Rice, this recipe uses Orzo, a pasta made of semolina flour and other hard varieties of wheat, and is shaped like rice. Orzo, translated to "Barley," in Italian, is cooked and served like pasta.

Orzo pasta is very versatile and can be used in a range of recipes, from soups to salads, to casseroles and is an excellent substitute when making risotto!

The starch from the Orzo resembles Arborio rice, resulting in the same creamy risotto texture. In this recipe, the mushrooms are a great partner, adding meatiness and tons of flavor, that creates a comforting and indulgent meal.

OZ2.JPG
OZ M.JPG
ORZO MUSHROOM.JPG

Ingredients 

  • 2 cups vegetable stock

  • 2 cups whole milk

  • 1 ounce dried porcini mushrooms, rinshed

  • 2 tablespoons extra- virgin olive oil 

  • ½ pound mixed mushrooms, such as stemmed shiitakes or trimmed cremini, or other wild mushrooms, sliced

  • Salt 

  • 2 tablespoons butter

  • ⅓ minced onion 

  • 2 garlic cloves, minced

  • 1 ½ cups orzo, ( or arborio rice, which is the classic grain used in risotto) 

  • ¼ cup white wine 

  • Black pepper

  • Freshly grated Parmigiano - Reggiano

Recipe

  1. Combine the vegetable stock, milk and dried porcini in a medium saucepan and bring to a simmer, keep warm over low heat.

  2. Heat the olive oil in a large saucepan over medium-high heat. Add the mushrooms season with salt, and cook until they release all their liquid.

  3. Reduce the heat to medium and cook until the mushrooms are golden brown, and about 12 minutes total. Transfer mushrooms to a plate.

  4. Melt the butter in the same saucepan over medium-high heat. Add the onion and garlic and cook until translucent, about 3 minutes. 

  5. Add the przo and stir to coat it evenly with the butter. 

  6. Add the wine and cook, stirring until it has been absorbed. Turn the heat to medium-low, add 1 cup of the warm vegetable stock mixture, and cook, stirring constantly, until the orzo has absorbed all the liquid. 

  7. Continue adding the stock mixture ½ cup at a time and stirring until it has been absorbed each time before adding more. 

  8. The risotto is done when the orzo is al dente and is suspended in a silky sauce, about 30 minutes.

  9. Stir the sauteed mushrooms into the risotto. Season with salt and pepper and serve immediately, with grated Parmesan.

Macaroni & Cheese

What is more comforting than a bowl of warm mac & cheese! NOTHING.

This recipe is perfect for a weeknight meal because of how simple it is to make, and also, it can easily be doubled for any holiday like Thanksgiving or just a family dinner.

Before jumping straight to the recipe, let's breakdown the important qualities to the perfect mac & cheese.

  1. Pasta - Look for a pasta with a lot of nooks and crannies. I love to use cavatappi, but other popular shapes are elbow pasta, shells, or pipette.

  2. At least 2 Cheeses - When it comes to choosing your cheese, remember to use at least 2 in your recipe, 1 sharp, and 1 creamy. Using at least two will give your mac and cheese creaminess while the other will give a flavor punch. My favorite cheeses to use are Gruyere and Cheddar! But any mix of sharp and creamy cheese will do like these:

    • Sharp Cheese - Parmesan, Pecorino, aged Asiago,

    • Creamy Cheese - Gouda, Monterey Jack, and Fontina, cream cheese

  3. Grate your cheese! - Picking up pre-shredded bag and cheese is tempting; however, I urge you to think twice! The pre-shredded cheese bags have stabilizers and anti-caking agents, lessen the flavor of the cheese, and it won't melt properly. BUT, if you are tight on time, I advise you to pick only one pre-shredded cheese!

  4. Spices - this recipe has mustard powder and a pinch of cayenne pepper. Adding a pinch of spice really makes all the difference! The mustard goes really well with the cheese, and the pepper just adds that extra kick.

photo1 2.jpg
photo2 2.jpg
photo12.jpg
photo11.jpg
photo3 2.jpg

Ingredients

  • 4 tablespoons unsalted butter, plus more for baking dish

  • ¾ cup panko (Japanese breadcrumbs)

  • ¼ cup Parmesan, finely grated 

  • 2 teaspoons fresh sage leaves

  • 1 teaspoon kosher salt, divided, plus more

  • 8 oz. cavatappi 

  • 2 ½ cups whole milk

  • 2 shallot, grated

  • 1 garlic clove, finely grated

  • 2 tablespoons all-purpose flour

  • 4 oz. Gruyère, grated 

  • 8 oz. mild white cheddar, grated 

  • ½ teaspoon English mustard powder

  • Pinch of cayenne pepper

Recipe

  1. Preheat oven to 350°. Butter a 2 qt. Baking dish. 

  2. Melt 2 Tbsp. butter in a medium skillet over medium heat. Add panko and cook, stirring, until crumbs are golden brown, 6–8 minutes. Transfer to a small bowl and toss with Parmesan, thyme leaves, and ¼ tsp. salt.

  3. Cook pasta in a large pot of boiling salted water, stirring occasionally, until al dente (the noodles will continue to cook in the cheese sauce, so take them out a minute or two before you think they’re actually done). Drain pasta; let cool while you make the sauce.

  4. Bring milk to a bare simmer in a small saucepan; keep warm. Melt remaining 2 Tbsp. butter in a medium saucepan over medium-high. Add onion and garlic and cook, stirring, until onions are fragrant and beginning to soften, about 2 minutes. Sprinkle flour over and cook, stirring constantly, until mixture starts to stick to bottom of saucepan, about 1 minute. Add warm milk in a few additions, whisking to combine after each addition.

  5. Bring béchamel sauce to a boil, then reduce heat and simmer, stirring, until sauce is thickened and doesn’t feel grainy when a little bit is rubbed between your fingers, 6–8 minutes.  Add the grated cheese, mustard powder, cayenne, and ¾ tsp. salt and stir until cheeses are melted and sauce is smooth. Remove from heat and mix in pasta; transfer to the buttered baking dish.

  6. Bake 10 minutes. Top with Parmesan breadcrumbs and bake until sauce is bubbling around the edges, 8–10 minutes longer. Let cool in pan 15 minutes before serving.


Adapted from Bon Appetit

Butternut Squash Ravioli

It's officially Fall! My favorite cooking and baking season!

I love the warm spices, and hearty vegetables autumn gives us. One of my favorite ingredients to cook with is squash, whether it's pumpkin, butternut, or acorn; the abundance of varieties gives me so much to work with. I wanted to open this season with my absolute favorite pasta, Butternut Squash Ravioli.

I chose to cook with butternut squash rather than pumpkin, because I enjoy the neutral flavor butternut squash has, as opposed to the somehow strong flavor of the pumpkin. It allows me to control the flavor a bit more.

I used the food processor to make the pasta, which I'm sure every Italian is fainting over at this very moment, but this process worked brilliantly! Not only was it quicker, but less messy!

If a food processor is not up to your alley or if you don't have one, my Fresh Pasta Dough recipe works perfectly for ravioli as well.

The filling is made with butternut squash, brown sugar, nutmeg, salt, and pepper - working beautifully together. The brown sugar brings out the natural sweetness of the squash, while the salt and pepper help balance those flavors, and a hint of nutmeg warms it all up!

Making the ravioli may be intimidating, but I promise you it's a lot easier than you think and tons of fun! A traditional ravioli is usually square, but today we are throwing the rule books out the window and making round ravioli.

I used a teaspoon to help to measure the filling, but you can use even a piping bag to ensure an even dollop.

Time to shape the ravioli! During this step, you can be creative, if you don't have a ravioli cutter, you may use a cup and crimp the edges with a fork, or a cookie-cutter works just as well.

Making pasta from scratch if often very intimidating, making people too afraid to try it, but I hope this recipe allows you to face your fears!

Remember, cooking is supposed to be fun, and even though you may not get it perfect the first time around, practice makes it perfect!

photo2.jpg
photo3.jpg
photo4.jpg
photo9.jpg
photo1.jpg
photo7.jpg
photo5.jpg
photo6.jpg
photo13.jpg
photo15.jpg
photo11.jpg

Ingredients

Food Processor Pasta Dough

  • 2 cups all-purpose flour

  • 1/2 teaspoon salt

  • 3 large eggs

Butternut Squash Filling

  • 1 lb butternut squash

  • 1 egg yolk

  • 1 tablespoon brown sugar

  • ½ teaspoon ground nutmeg

  • salt and pepper

Rosemary Brown Butter Sauce

  • 2 -3 sprigs of rosemary

  • 1 stick of salted butter

  • 2 cloves garlic, minced or grated

  • Salt and pepper

  • 1/4 cup white wine 

Recipe

Ravioli Filling 

  1. Preheat your oven to 400° F and line a baking sheet with parchment paper. 

  2. Place butternut squash on a pan, cut sides up. Prick the squash, drizzle with olive oil and generously season with salt and pepper. Roast for 35 to 45 minutes, or until soft. Allow to cool.

  3. Scoop out the flesh of the squash into the bowl of a food processor. Add egg, brown sugar, nutmeg, and salt & pepper, purée until smooth. Place the filling in a bowl, cover, and set aside.

Pasta

  1. In a clean food processor, add flour and salt, pulse a few times to combine. In a separate bowl, lightly beat eggs. Drizzle the eggs in a food processor, pulse until mixture comes together. * If the dough is too dry, drizzle in some water and pulse again, OR, if the mix is too wet, add some flour.

  2. Turn the pasta dough onto a lightly floured work surface and knead the dough into a smooth ball. Cover the dough with plastic wrap and rest for 30 minutes.

  3.  Secure a pasta machine to the edge of a long countertop. Using a bench scraper, cut the dough into four pieces. Keep the extra dough covered in plastic wrap while working with one piece. With a rolling pin, roll a piece of dough into a rough rectangle so that it will fit inside the widest setting of the pasta machine. Roll the dough through the machine, catching it with one hand as you roll with the other. Take the dough and tri-fold it like a letter. Turn the dough, so one open end faces the machine and roll it through on the widest setting again. Fold, turn, and roll once more on the widest setting. 

  4. Continue rolling the pasta through the machine without folding, adjusting the rollers to a smaller setting each time, until the desired thickness is reached. 

  5. Place a 12-by-4 ½ - 5-inch sheet of pasta on a lightly floured surface with the longest edge facing you. Fold the dough in half lengthwise, press gently to make a crease, and then unfold the dough. 

  6. Place about two teaspoons of the butternut squash filling 2 inches along the furthest edge of the pasta, about 1 1/2 inches in from the edge. Dip a finger in a small bowl of water and drag your finger around each mound of filling to moisten the pasta. 

  7. Fold the front edge of the dough over the mounds. Starting in the center, gently press and shape the dough around each mound, working out to the sides. To ensure that the pasta cooks evenly, make sure the air is pressed out, and the filling is secured neatly in a circular mound in the pasta.

  8. Use a 2-inch round pastry cutter to cut the ravioli into circles, Or, crimp edges with the tines of a fork. Transfer the ravioli to a lightly floured sheet pan with semolina flour. Repeat with the remaining dough to make about 40 raviolis.

  9. Meanwhile, in a medium saucepan, brown the butter, stirring often until the butter is golden and toasted. Add the rosemary and garlic and cook 30 seconds to a minute or until fragrant. Pour in the wine, season with salt and pepper and bring to a simmer.

  10. Bring a large pot of salted water to boil. Boil the ravioli in batches for 2-3 minutes or until they float. Drain. Be gentle when working with the ravioli as they are delicate.

  11. Add the drained ravioli to the brown butter and toss to coat.

  12. Serve immediately.

* Freeze leftover raviolis by placing them in a single layer on a baking sheet. Once they are frozen, transfer them to an airtight freezer-safe bag or container. Cook them straight from the freezer. 

Spring Salmon Pesto Pasta

I love pasta but eating it every day isn’t recommended (apparently). So my new favorite substitute is legume-based pasta, which includes lentils, beans, peas, and chickpeas. This past year, legume-based pasta have been having a real moment. It first began with a few new brands, but now popular brand pastas have also launched a legume-based line.

The benefits of switching include fewer carbs, more fiber and more protein than regular pasta. They are also gluten-free and contain iron.

While you may not be sold yet, the flavor and texture of the pasta are not that much different than any old regular boxed pasta. What I have noticed is that most legume-based pasta is very toothsome. Other than that, there isn’t much of a difference in terms of flavor.

GIve the delicious recipe a try and enjoy a new alternative to a week night classic!

MY Portuguese Mother // Salmon Pesto Pasta
 

Ingredients 

Pesto :

  • 1 cup fresh basil leaves

  • ¼ cup fresh mint leaves, plus more for serving

  • 2 cloves garlic, minced

  • 1/4 cup toasted pine nuts (or for raw walnuts)

  • 1 medium lemon, juiced & zested

  • 1/3 cup olive oil, more for serving

  • 1/4 cup parmesan cheese, plus more for serving

  • Salt and pepper

Pasta :

  • 12 oz. red lentil pasta (or substitute for whole-grain)

  • Pesto

  • 1 lb. cooked salmon, roughly flaked (great for using leftover grilled or poached salmon)

Recipe

Pesto

  1. In a food processor or blender, pulse basil leaves, mint leaves, garlic, pine nuts, lemon juice, and parmesan cheese together. Slowly add the olive oil until pesto is smooth. Set aside.

Pasta

  1. Bring a large pot of water to a boil and add a generous pinch of salt. Once boiling, add pasta of choice and cook according to package instructions. Reserve ½ cup of pasta water, and drain pasta. Set aside in a large bowl.

  2. Add the pesto to the pasta and toss to combine. Add reserved pasta water if needed to loosen pesto pasta. Toss in the flaked salmon. Finish with lemon zest and mint leaves. Serve immediately.


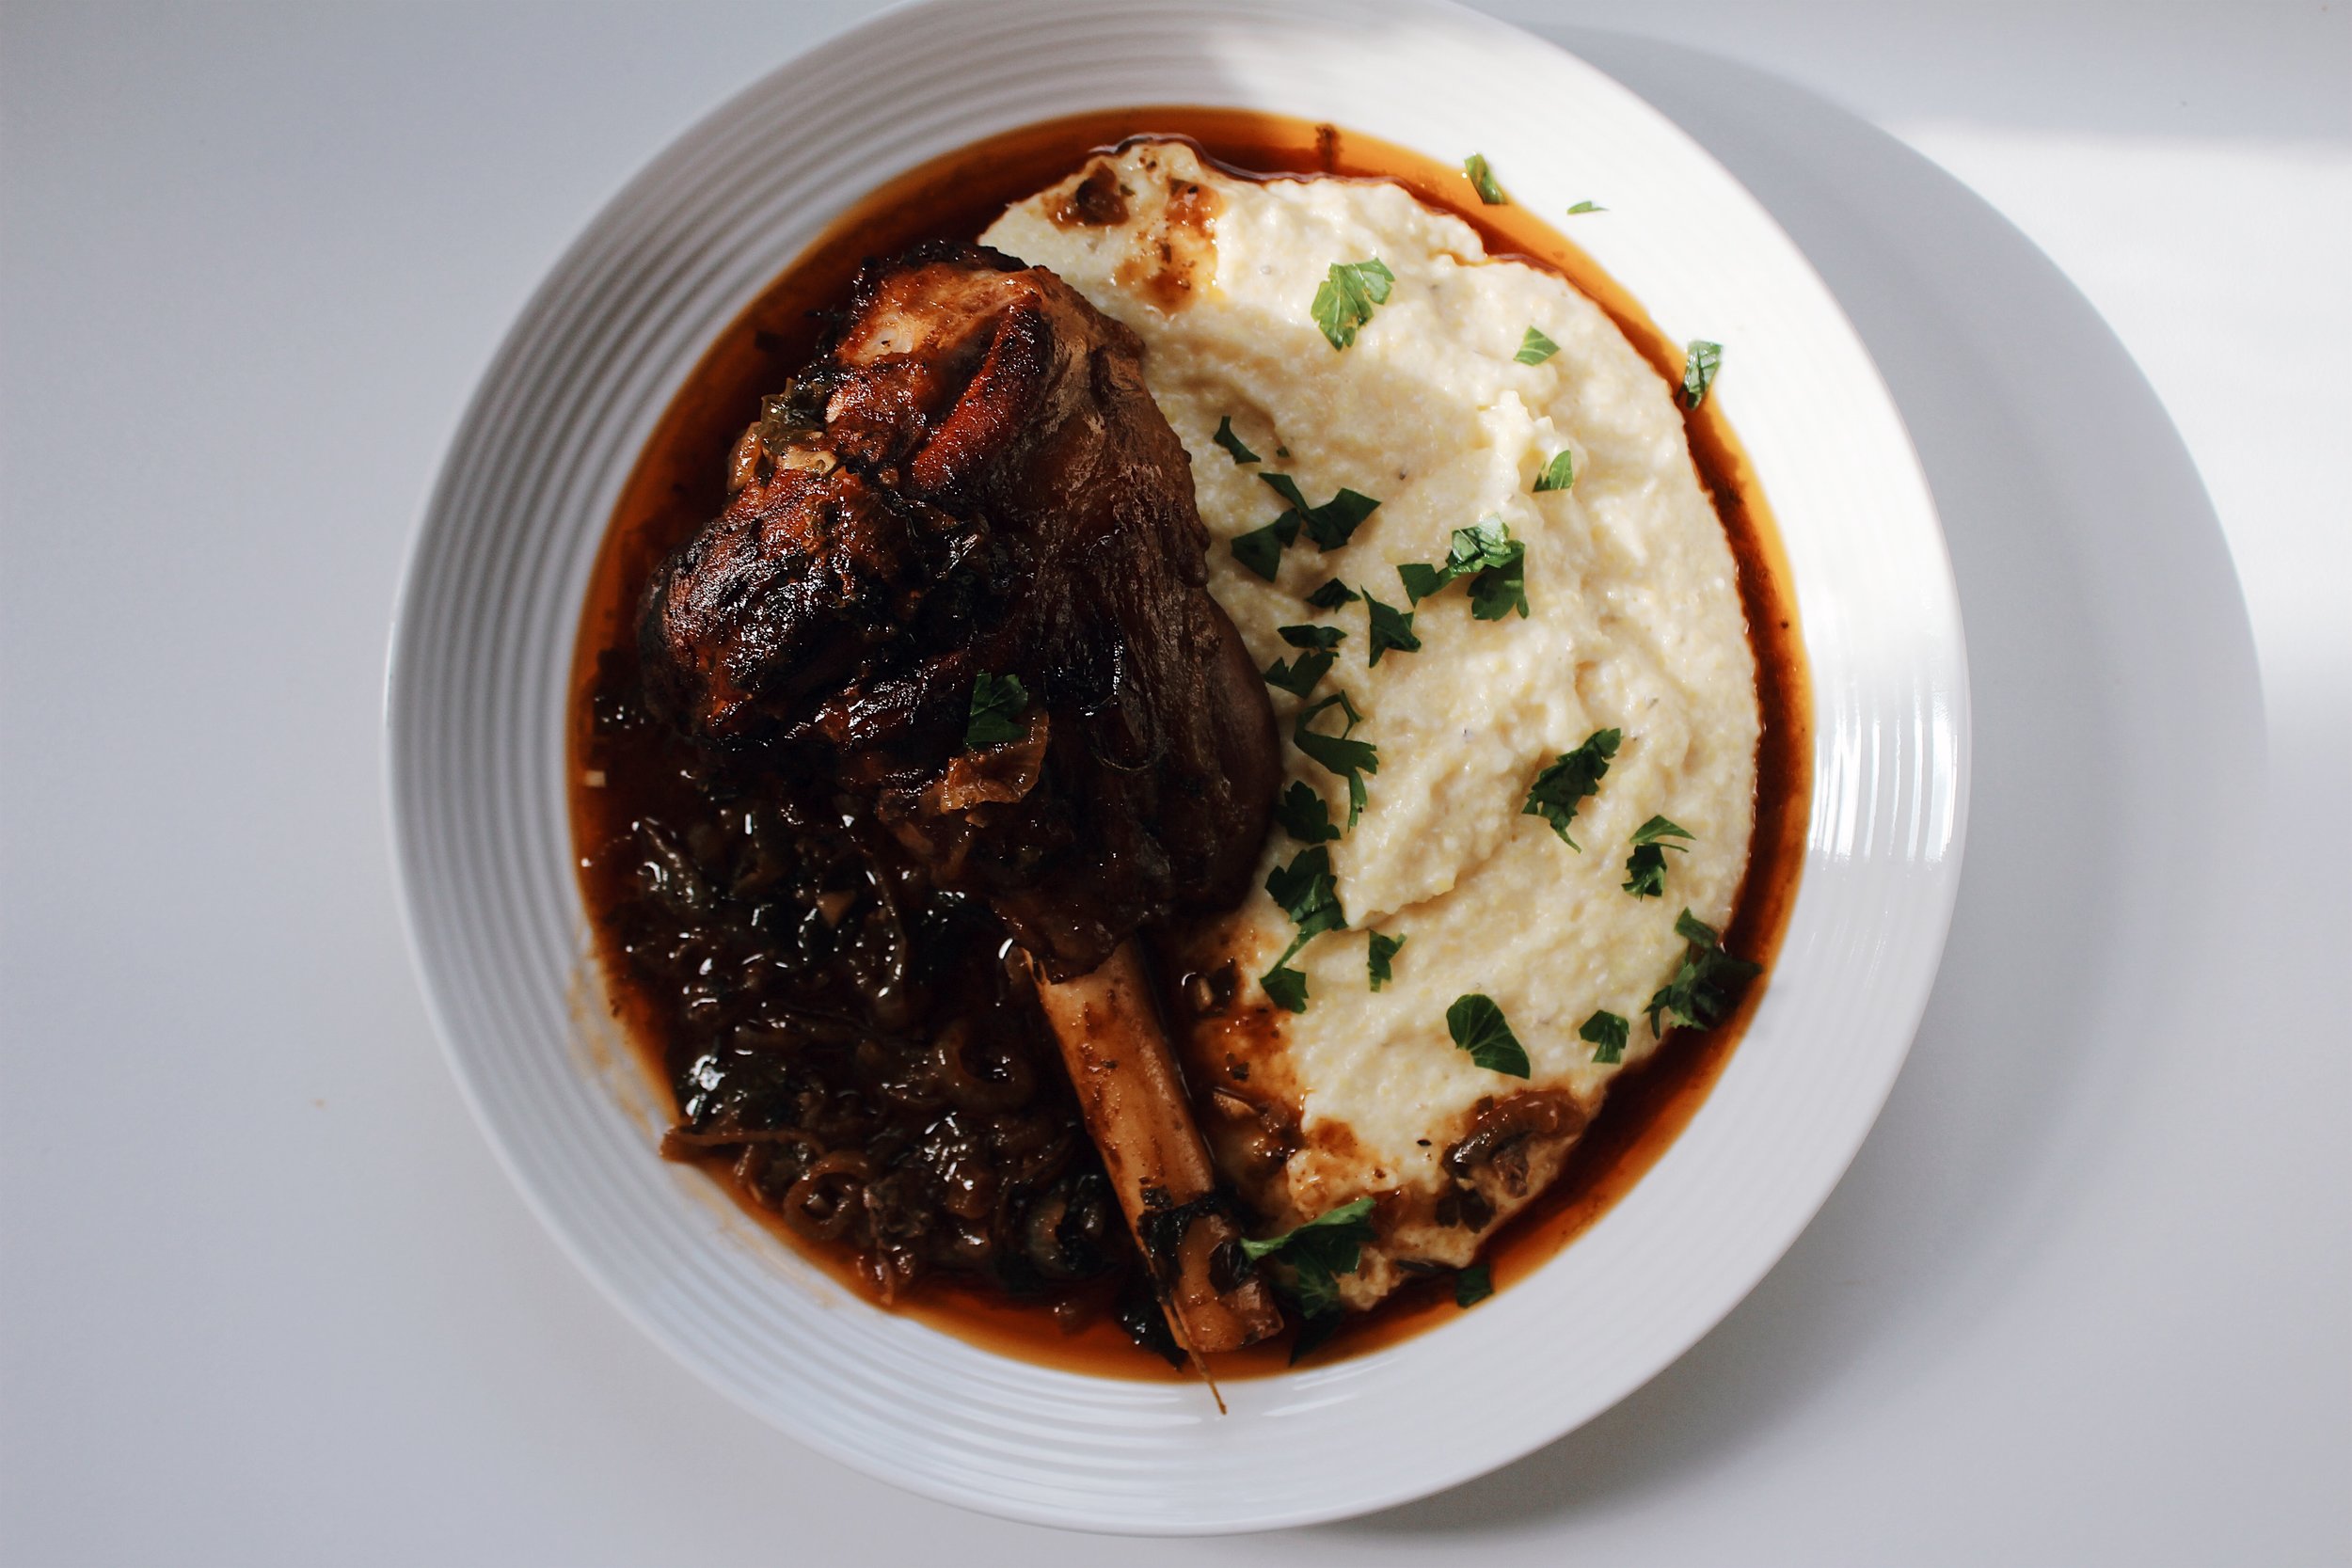
Braised Lamb Shanks & Creamy Polenta

First snowfall of the season and boy did it take us by surprise in New Jersey! 

There is probably nothing that I enjoy about the winter other than the excuse to stay in and cook! 

One of my ultimate favorite comfort foods are these beautiful Lamb Shanks. I think visually they seem a little daunting to people; however, this recipe is easy, foolproof and can make any beginner cook look like a master chef! 

The lamb shanks are rubbed with spices, and cooked in wine (oh yes), and served alongside creamy polenta.

The polenta is simmered to ensure a beautiful creamy and thick consistency that will absorb the sauce from the lamb.

If polenta is not your thing, egg noodles go exceptionally well with this dish!

Happy Weekend and Happy Cooking!

LAMBSHANKS9.jpeg
LAMBSHANKS8.jpeg
LAMBSHANKS6.jpeg
lamb shankJPEG image-017779432289-1.jpeg
lamb shankJPEG image-017779432289-5.jpeg
lamb shankJPEG image-017779432289-3.jpeg
lamb shankJPEG image-017779432289-2.jpeg
lamb shankJPEG image-017779432289-4.jpeg

Ingredients

Lamb Shanks

  • 3 medium lamb shanks

  • 4 medium onions, sliced

  • 6 garlic cloves

  • 4 tbsp of tomato paste

  • 3 tbsp of paprika

  • 1 bunch of parsley, coarsely chopped

  • 8 tbsp of butter, cut in small pieces

  • 1/4 cup of olive oil

  • 2 cups  white wine

  • ½ cup water + 2 tbsp

  • 3 tbsp of coarse salt & pepper

  • 3 bay leaves

Polenta

  • Kosher salt

  • 6 cups water

  • 1½ cups coarse polenta ( I used Bob’s Red Mills)

  • ¼ cup unsalted butter

  • ½ cup grated Parmesan, plus more for serving

  • Freshly ground black pepper

  • ½ cup chopped fresh parsley

Recipe

Lamb Shanks

  1. Set the oven to 425 F

  2. In a mortar, grind garlic, parsley and salt into a paste. Mix in the paprika, pepper, tomato paste,  2 tbsp of water and olive oil.

  3. Rub the shanks with the mixture.

  4. Place the seasoned meat in a large roasting pan, top with sliced onions, bay leaves and butter.

  5. Pour in the wine and the rest of the water (½ cup) around the meat.

  6. Roast for 1 ½ hour , basting every half hour .

  7. Serve with Polenta.

Polenta

  1. In a large saucepan, bring 6 cups of salted water to a boil.

  2. Reduce heat to medium-low, whisking constantly, add in the polenta.

  3. Cook, and whisk often  until polenta is thick and smooth, 20–25 minutes.

  4. Season with salt and pepper. Add butter and ½ cup Parmesan to polenta and whisk until melted and incorporated.

  5. Serve warm, top with extra Parmesan.